

In last 2 articles, we learn about basics of Node.js and creating a small server application to send back HTML response. Till now, It was all fine. But creating application like this will be messy. It’s like building home without having architectural diagram of what we are building and what’re our helping tools.
In same way, building enterprise apps require some kind of frameworks. For Node.js, there are lot of frameworks like ExpressJS, Socket.IO, Koa.JS, Sail.JS, Nest.JS etc.
For simplicity, we will be learning Express. Express is one of the most popular and used frameworks for the node.js. It is used for building a scalable and robust web application using the node.js as a server-side language. So, we’ll first start with ExpressJS fundamentals and then will will dive into deep understanding.
But First thing first
Create a new application folder and go to that folder and type the below command to initiate the package.json file of our application.
npm init
It will ask few basic questions(you have already filled that in last article). Do remember your entry point file name, I’ve given server.js for entry point for this exercise.
Note: Entry point is the part of the application from where Express JS application started.
Once, our package.json is up then we need to fire up our ExpressJs. For that, execute below command
npm install express --save
Now create our entry point file server.js in the root directory of the project and copy the below code:
So, in above code, we are calling Express module from node_module folder. Next, we used HTTP get verb to handle get request and sending up the response. Last line helps express to listen on particular port i.e. 3020 in our case.
Let’s run our code using nodemon and see the output. I’ll leave it on you to check the output and fix-up any error.
Routing In Express
Node.js Express framework provides simple and easy to use server routing. Below is the basic format of routing in the Express framework
app.VERB(path,middleware,callback);
Here, path is the URL from where request will come, VERB is any one of the HTTP methods like GET, POST, DELETE, PUT, PATCH and middle-ware helps do other tasks before proceeding the request to the main function, callback is used to send the response to the client with appropriate status.
Request Object of the Router
Request object of the node.js express framework contains the following property
- request.params: It stores the HTTP GET method parameters. For example, In the URLhttps://localhost:3020/param1/param2, we can get the param1 and param2 by using the request.params
- request.body: It stores the HTTP POST method data. If you want to get the data of the form submitted by using the POST Method then you can easily get that by using request.body
- request.query: It stores the HTTP GET method data. If you want to get the data of the form submitted by using the GET method then you can easily get that by using request.query
- request.url: If you want to get the requested URL then you can get that by using this property of the request object.
- request.ip: is used to get the IP of the requested browser.
There are other properties as well in request object like request.headers and request.accepts
Response Object of the Router
Like Request, Response object also has many important properties like:
- response.send() is used to send the response to the browser.
- response.json() send data to the client in the JSON format.
- response.cookie(name,value,duration) is used to set the cookies on browser.
- response.redirect([redirect status], URL) redirect the browser to the specified URL.
- response.status() set the status of the response requested by the client.
- response.render() renders the file to the browser.
Storing Serve Static Files
Serving static files like CSS, JS, Images in express, one has to set path in framework. Generally, Public folder is being used to store these files, but it can be stored in other folders. For this blog, we are using Public folder only. Let’s create a new folder in our application and set this path in our server.js file to serve these files.
app.use(express.static('public'));
Template Engines
One of the most important functionality is to create the HTML file in the application using very minimal code. Template engines allow us to generate HTML dynamically by adding the variables in runtime.
There are many Template Engines available for node, one of them is handlebars. First, we have to first install it and then tell express to use this template engine for rendering HTML.
Install the handlebars by running below command
npm i --save hbs
Now, we have to tell express to use this as a template engine by adding below code in our server.js file. After adding handlebars code, the server.js file looks like below
Below line tells app engine to look into views folder for template files.
app.set('views', path.join(__dirname,'views'));
Create views folder in the root directory which will contain all our templates. Let’s create index.hbs file and paste below code
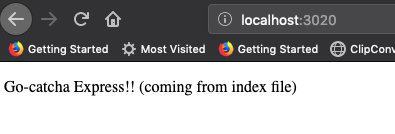
After creating above two files, run the server.js file and go to your browser and type the URL http://localhost:3020, you will see a page like below in the browser.
Above is no fun at all, it’s all basic. Let’s try something more…
Let’s try to create a random list and pass data from server.js file to index.hbs template file. Update server.js file like below:
and some more changes to our index.hbs file
Now, run the server.js file and go to localhost:3020, hit refresh several times, you should see a new list of pokemon’s names every time you hit refresh.